
Code Snippets
Free Code Snippets that I've written or created over time. These are available for free, or you can tip me with Ko-Fi (but not required to use the code)!
Like Button (requires Firebase)
Inspired by this Reddit post I was inspired to give it a shot and try to create a functioning like button that remains on-site within reason. I looked into a few options, but I disliked the way that the Google Sheets variant is. Personally, I was okay figuring out how to do it with a stronger backend available on Firebase.
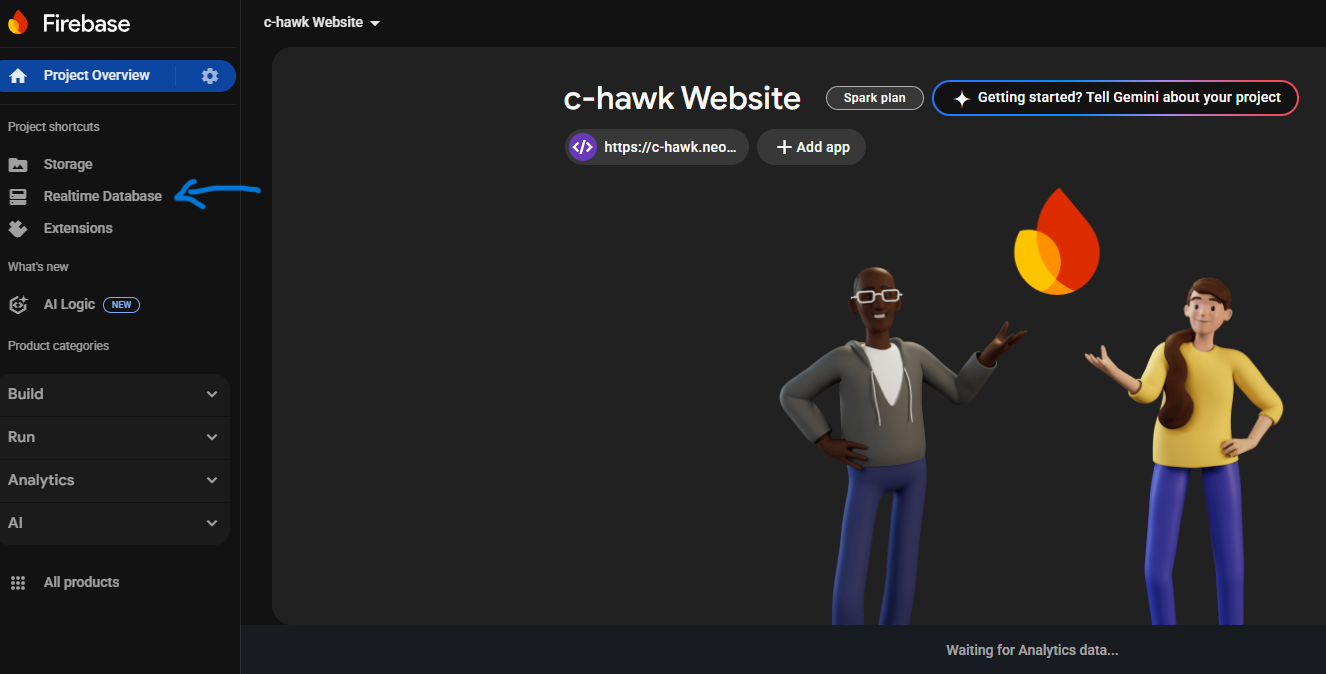
To start, you'll need to make a Firebase account and create a project. The easiest is to label it as your website, so for instance I named it "c-hawk Website" and choose Web App (for Neocities/Websites). With the free version, you will still have access to the Realtime Database. Once you have the new project created, choose the project and on the left you will see Project shortcuts. Go to Realtime Database and begin the setup.
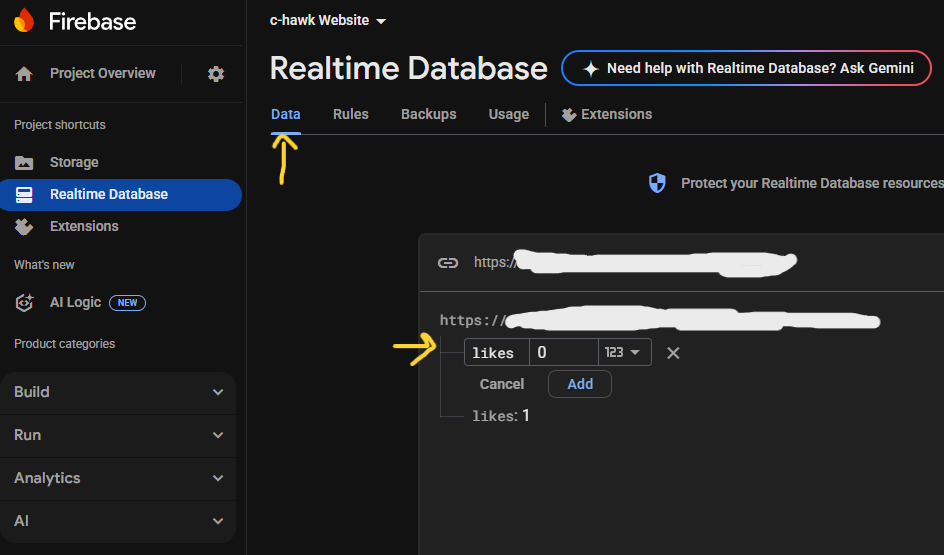
Under Data, you'll want to click the "+" that shows up next to your firebasio.com link in the Realtime Database dashboard. For ease of the tutorial, you can name this "likes". If you make multiple "Like Buttons" then you'll have to make individual database's for each button. This helps keep each numeric counter seperated.
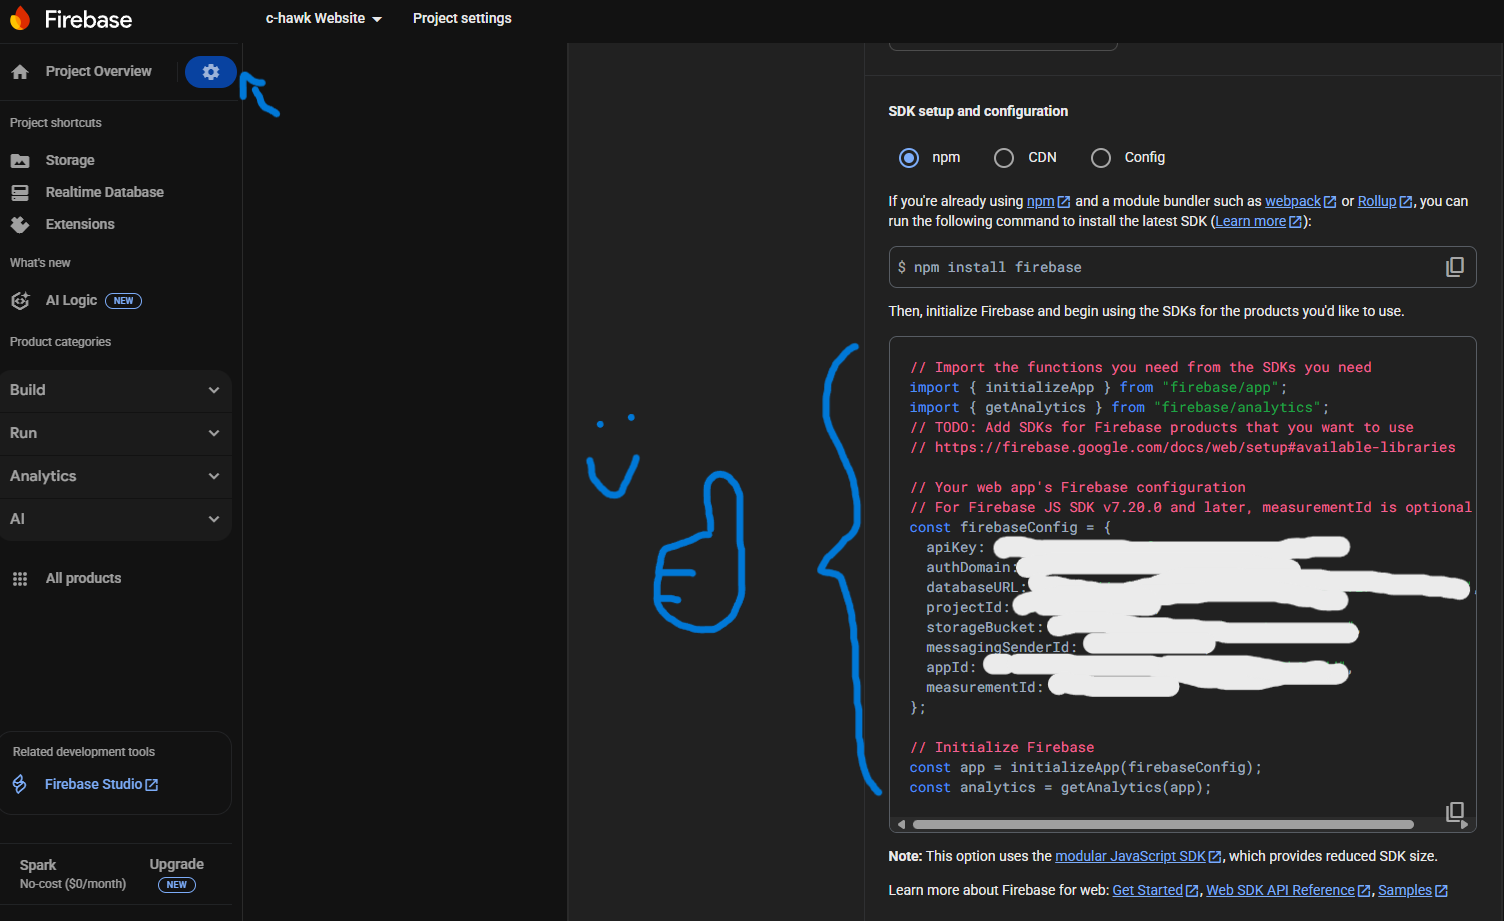
Once you have that set up, go to your Project Overview settings (cogwheel next to it). Scroll down under the General tab until you find "Your Apps", and select your new Web App. Firebase provides you with the script to implement under the script tag (this will be covered later). Copy this code into a blank Notepad for now, and open Neocities. Firebase uses modular JavaScript SDK which Neocities supports.
For general use, you will also likely need to set up the Rules on your Realtime Database to show "true" for both ".read" and ".write". However, this puts the database at risk of people gaining access and clearing it. There is a way to protect it that I will review afterwards. However, for testing purposes, return back to your Realtime Database and set those two "rules" to "true".
Pull up Neocities, and go to the page you want to impliment your button for. I'm going to provide the exact code for having labeled the button in the database as "likes".
CSS Code
You'll want to add this to your style section of the page the like button(s) will appear on. It affects the way that the buttons look (as all CSS does), it is currently set to a very simple black like button.
      <style>
      #likeBtn{
        padding: 10px 20px;
        background: #000000;
        color: white;
        border: none;
        border-radius: 8px;
        cursor: pointer;
        }

      #likeCount{
        margin-left: 10px;
        }
      </style>
JavaScript Code
Next, you'll have to implement JavaScript code. You can either do this on the page itself or call the script from a seperate file. Because the script has to be called for each database, I would reccomend seperate files personally if you intend to use multiple like buttons. You will have to alter the code as well to reflect this, but it's quite easy to do so. So for now, let's review the JavaScript.
      <script type="module">

      // Initialize Firebase
      import { initializeApp } from 'https://www.gstatic.com/firebasejs/9.23.0/firebase-app.js';
      import { getAnalytics } from 'https://www.gstatic.com/firebasejs/9.23.0/firebase-analytics.js'; //This can be commented out if you are not interested in Analytics
      import { getDatabase, ref, onValue, runTransaction } from 'https://www.gstatic.com/firebasejs/9.23.0/firebase-database.js';

      const analytics = getAnalytics(app); //This can be commented out if you are not interested in Analytics

      // Your web app's Firebase configuration
      // For Firebase JS SDK v7.20.0 and later, measurementId is optional
      const firebaseConfig = {
        apiKey: "YourAPIKey",
        authDomain: "YourAuthDomain",
        databaseURL: "YourDataBaseURL", //This URL is the URL in your Realtime Database on Firebase, under Data. Copy the URL "https://projectname.firebaseio.com/" or whatever it is listed as, and paste it here.
        projectId: "YourProjectID",
        storageBucket: "YourStorageBucket",
        messagingSenderId: "YourSenderID",
        appId: "YourAPPID",
        measurementId: "YourMeasureMentID"
      };

      // Variables (CONST) Set Up
      const app = initializeApp(firebaseConfig);
      const db = getDatabase(app);
      const analytics = getAnalytics(app); //This can be commented out if you are not interested in Analytics

      const likeBtn = document.getElementById('likeBtn');
      const likeCount = document.getElementById('likeCount');
      const userKey = "liked_" + window.location.pathname; //Local Fallback In The Event Database Doesn't Load

      const likesRef = ref(db, "likes");

      onValue(likesRef, (snapshot) => {
        likeCount.innerText = snapshot.val() || 0; //Takes A Snapshot of Like Count Value
        });

      //Defines Unique Visitors (per Browser, not IP) and Has Console Debugs
      likeBtn.addEventListener("click", () => {
        if (localStorage.getItem(userKey)) {
          console.log("You Already Liked This!"); //Console Debug for "Already Liked"
          return;
          }

        runTransaction(likesRef, (currentLikes) => {
          return (currentLikes || 0) + 1;
        }).then((result) => {
          if (result.committed) {
            localStorage.setItem(userKey, true);
            console.log("Thank You For The Like!"); //Console Debug for "Liking" Going Through, This line "console.log" is not necessary otherwise.
          }
          else {
            console.log("ERROR") //Console Debug for "Error"Variant 1 When Liking, This line "console.log" is not necessary otherwise.
          }
        }).catch((error) => {
          console.error("ERROR", error); //Console Debug for "Error"Variant 2 When Liking, This line "console.log" is not necessary otherwise.
        });
      });
      </script>
From here, you'll notice sections that refer to "likes". This is in reference to the "likes" on your database in Firebase. You'll want to change it to whatever you have it labeled as in the database. Theoretically, it should be capable of creating new databases automatically (you would still want to change it from "likes" to something else more easily identifiable), but if you're struggling to get it to work on Firebase like I was it's a bit easier to create it beforehand. Thus why we did so earlier.
HTML Code
And now, funny enough, the HTML which is the easiest part. It's a simple button, and you're able to make visual adjustments with CSS.
<button id="likeBtn">Like! ♥ || <span id="likeCount">0</span></button>